
MewZoom
Collection
Pretrained MewZoom models for purrfect quality image super-resolution.
•
6 items
•
Updated
A family of image super-resolution models with cat-like vision and clarity. Looking for the purrfect pixels? MewZoom pounces on blurry, low-resolution images and transforms them into crystal-clear high-resolution masterpieces using the power of a deep neural network. Trained on a diverse set of images and fine-tuned with an adversarial network for exceptional realism, MewZoom brings out every detail in your fuzzy images - simulanteously removing blur, noise, and compression artifacts while upscaling by 2X, 3X, 4X, or 8X the original size.
Fast and scalable: MewZoom incorporates parameter-efficiency into the architecture requiring less parameters than models with similar performance.
Ultra clarity: In addition to upscaling, MewZoom is trained to predict and remove various forms of degradation including blur, noise, and compression artifacts.
Full RGB: Unlike many efficient SR models that only operate in the luminance domain, MewZoom operates within the full RGB color domain enhancing both luminance and chrominance for the best possible image quality.
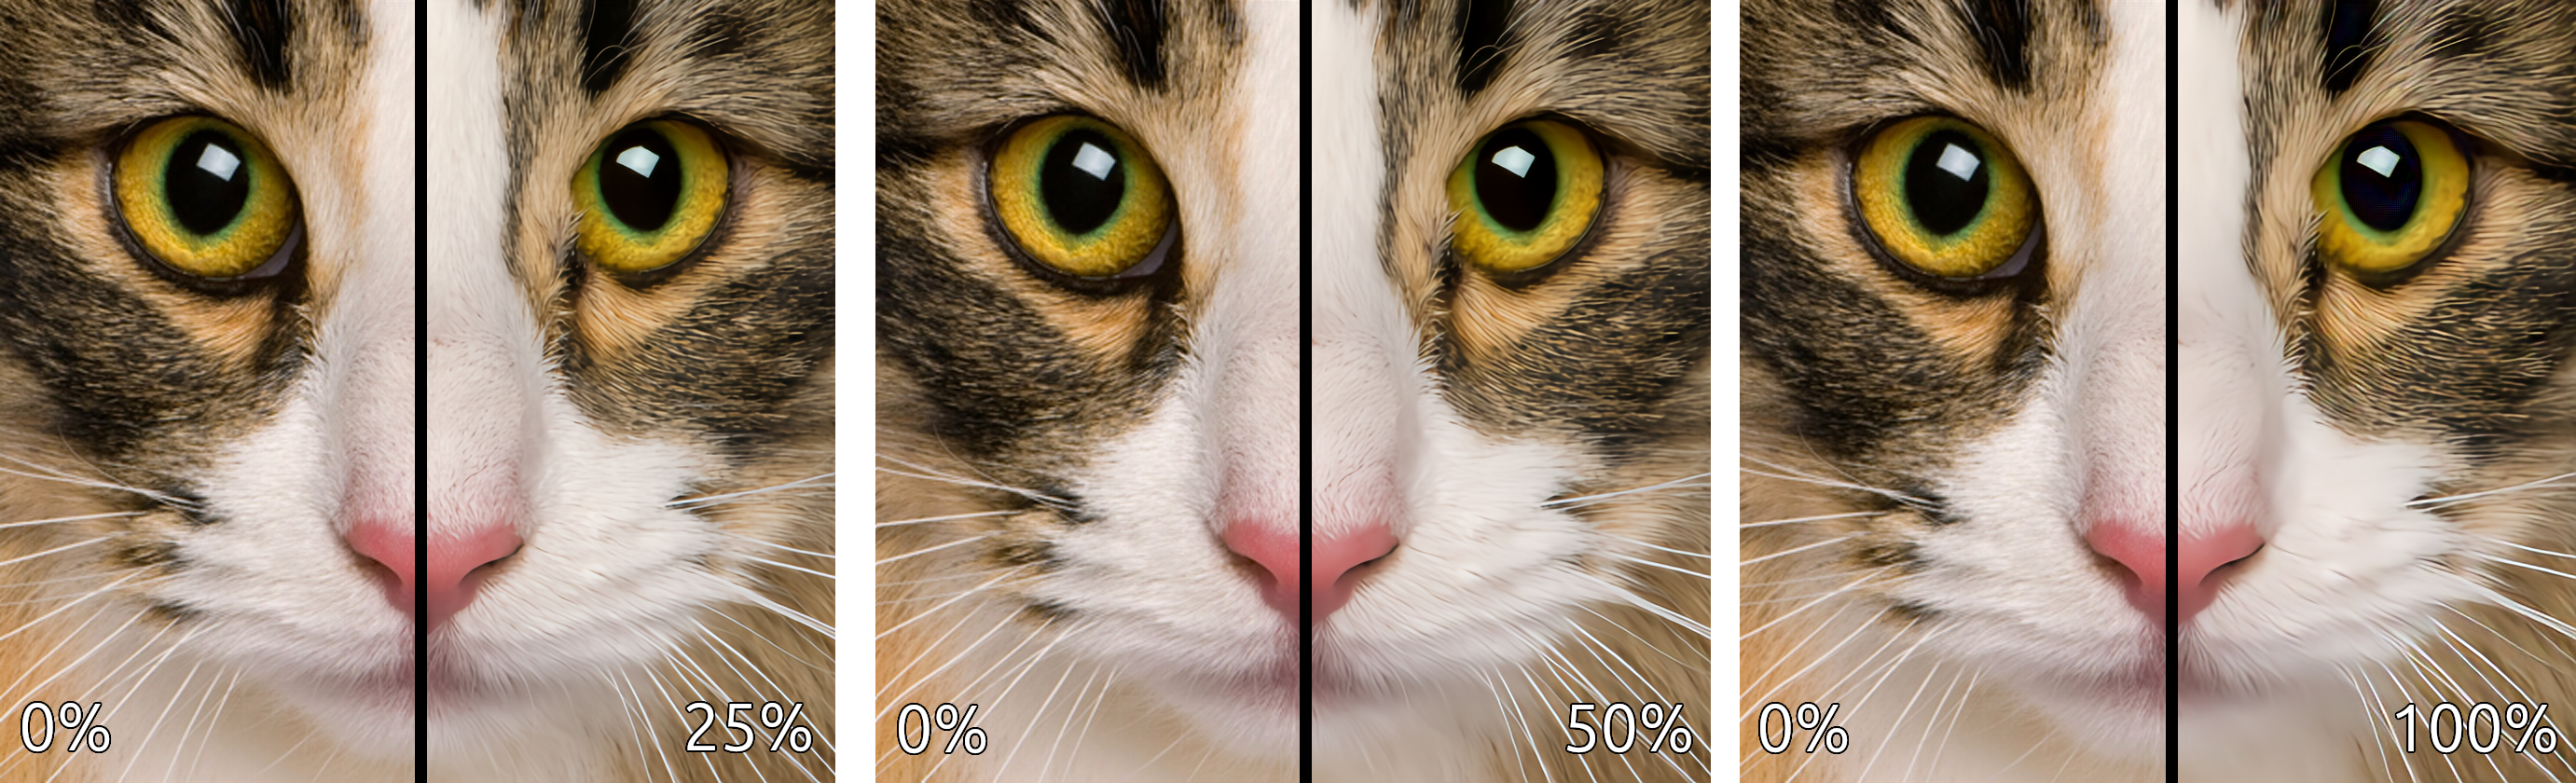
View at full resolution for best results. More comparisons can be found here.
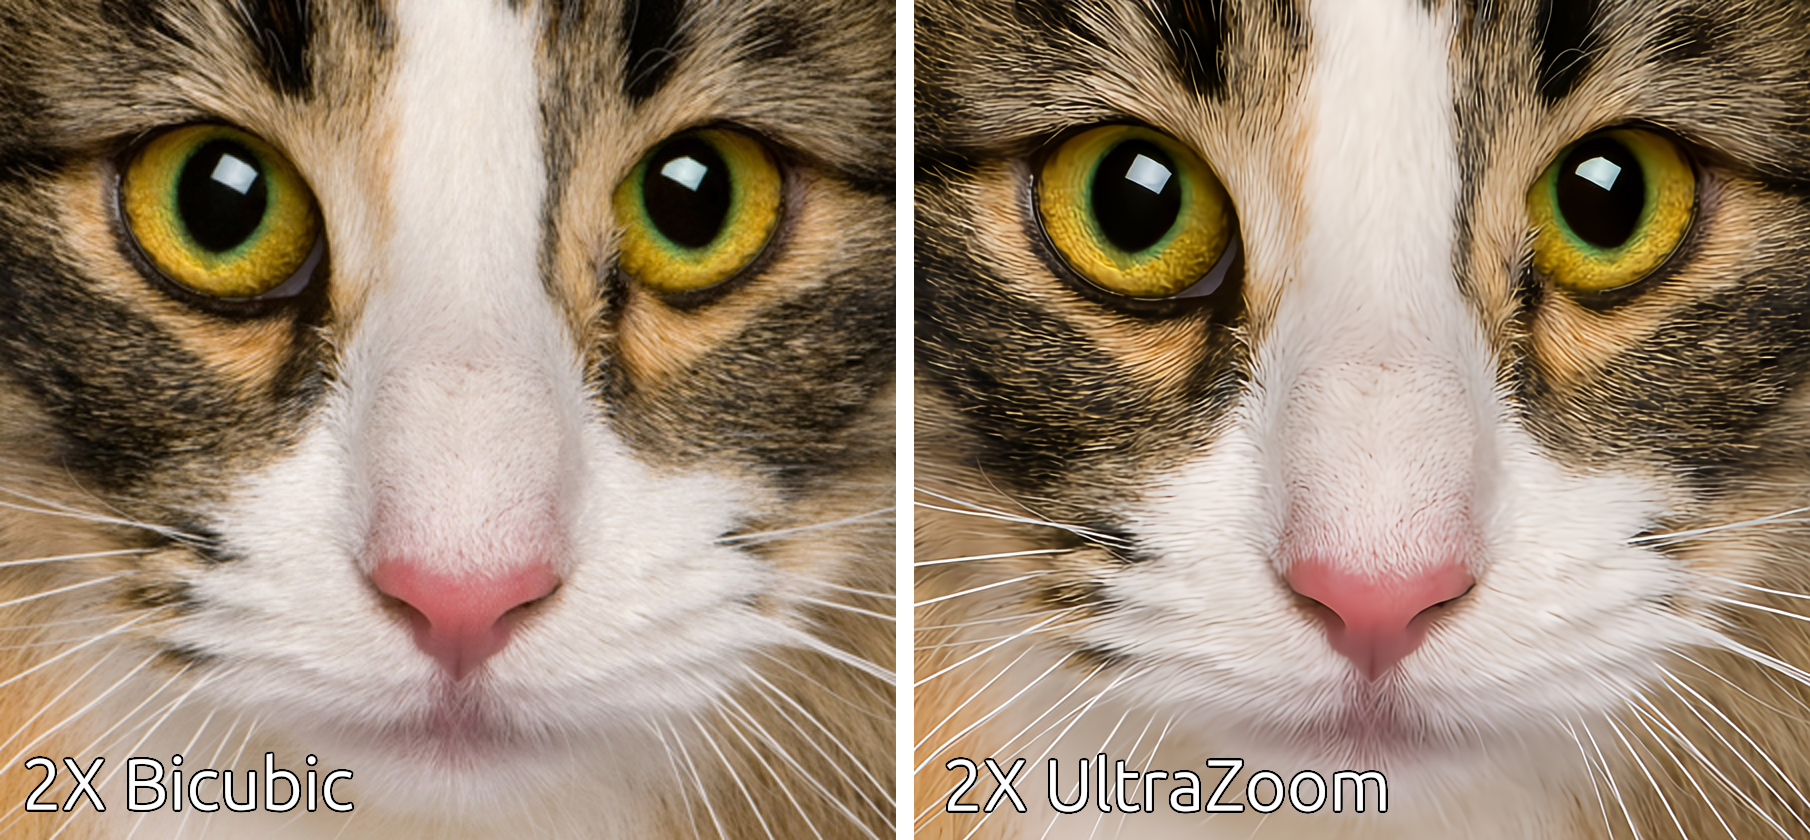
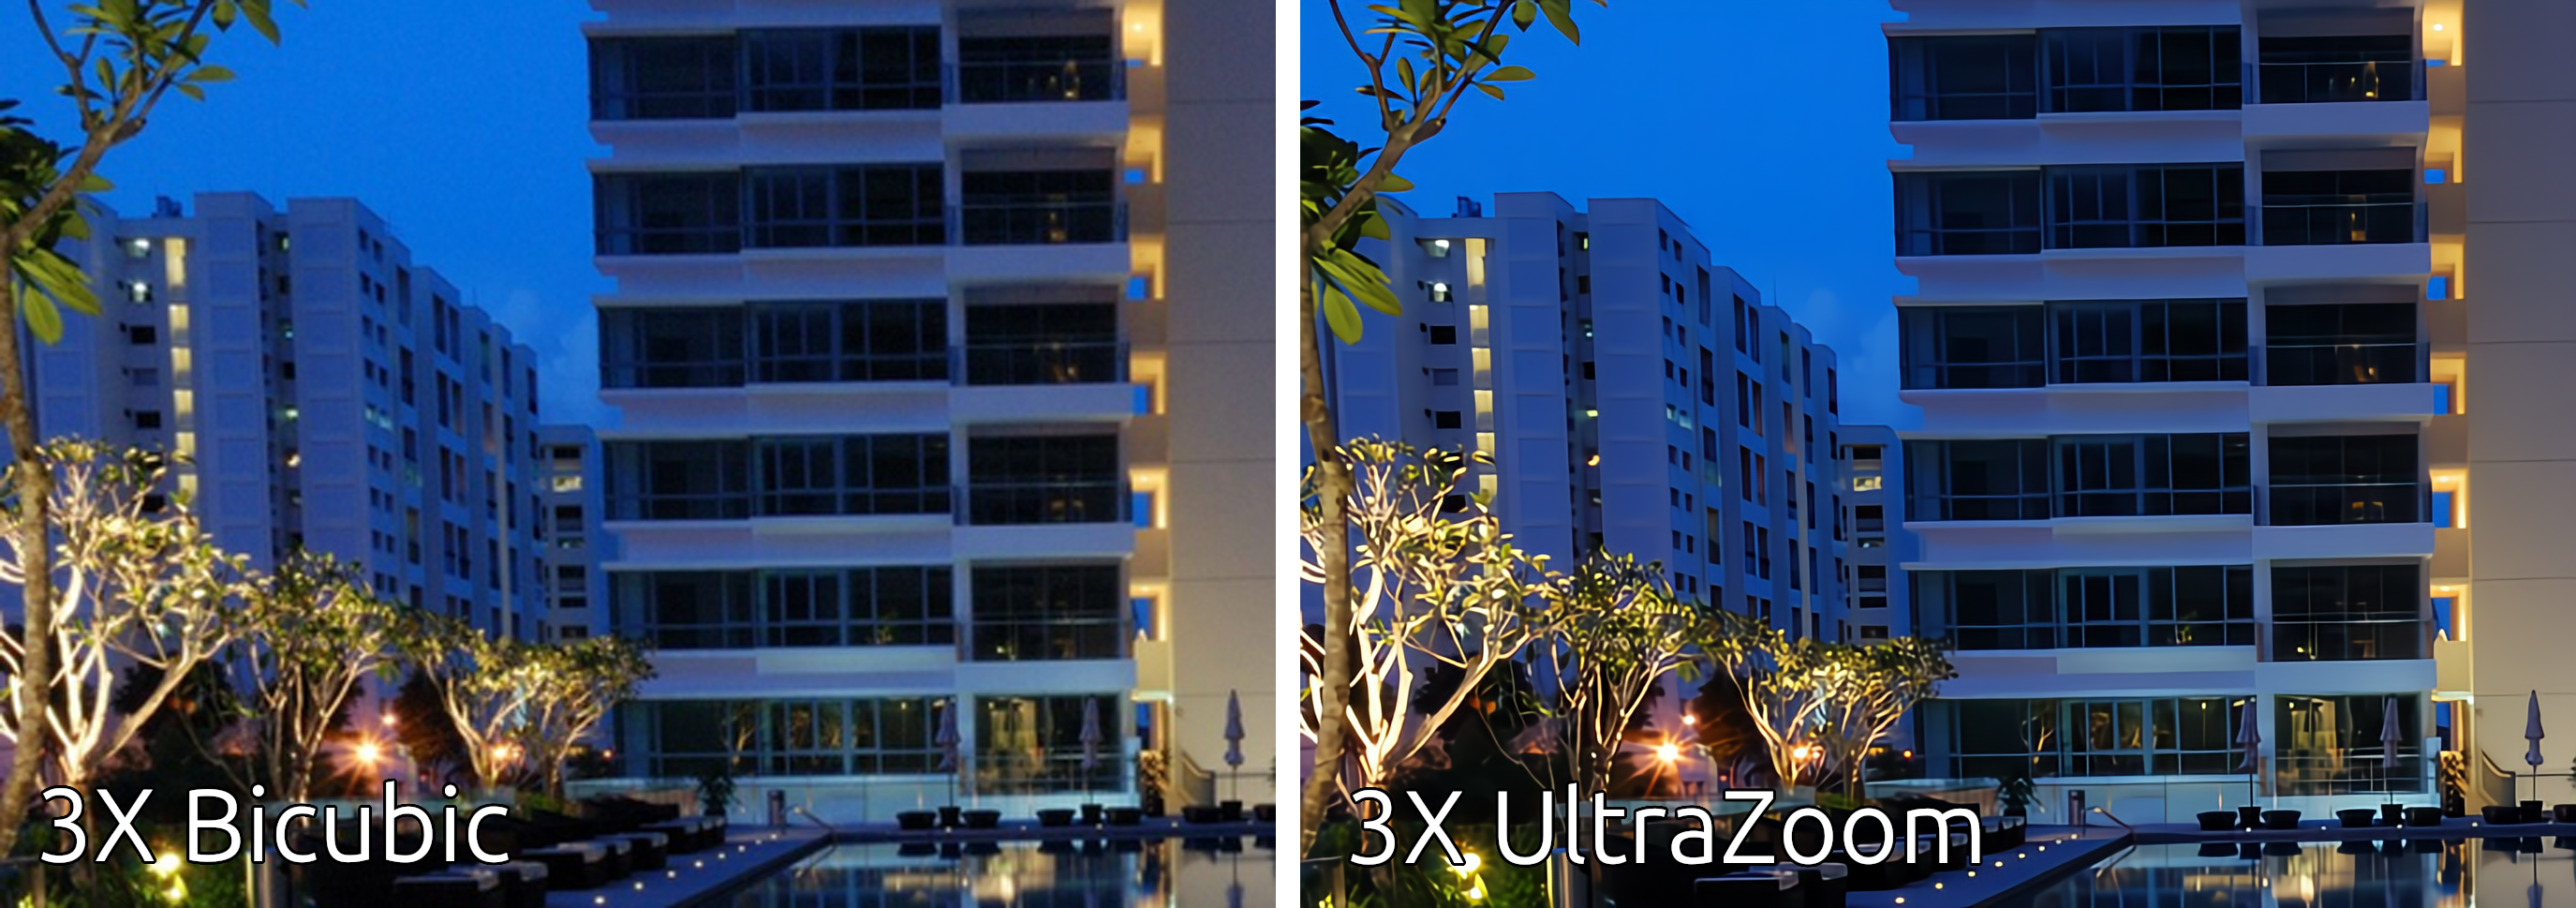
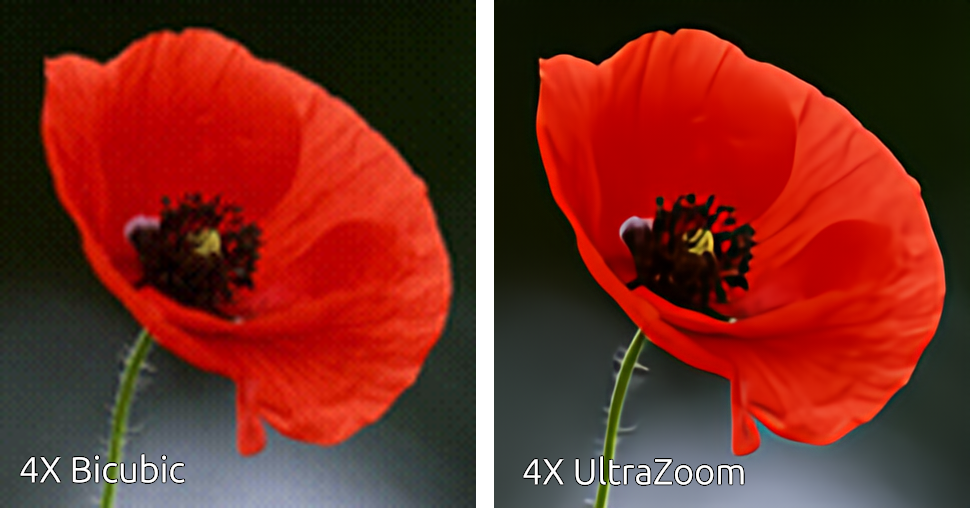
This comparison demonstrates the strength of the enhancements (deblurring, denoising, and deartifacting) applied to the upscaled image.
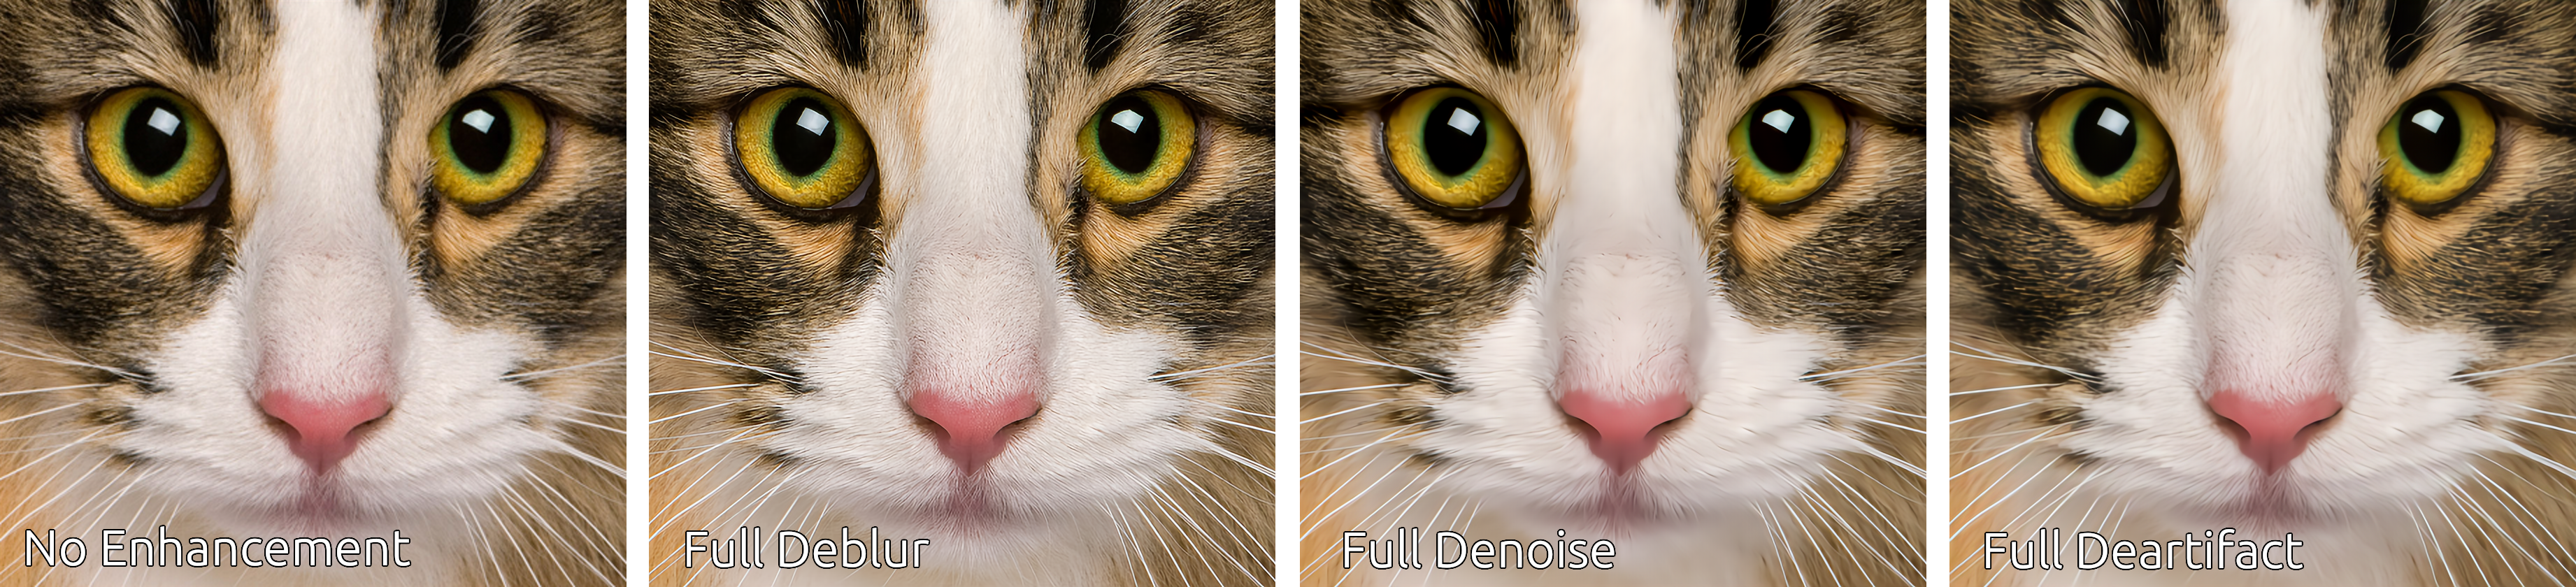
This comparison demonstrates the individual enhancements applied in isolation.
The following pretrained models are available on HuggingFace Hub.
| Name | Upscale | Num Channels | Encoder Layers | Parameters | Control Modules | Library Version |
|---|---|---|---|---|---|---|
| andrewdalpino/MewZoom-2X-Ctrl | 2X | 48 | 20 | 1.8M | Yes | 0.2.x |
| andrewdalpino/MewZoom-3X-Ctrl | 3X | 54 | 30 | 3.5M | Yes | 0.2.x |
| andrewdalpino/MewZoom-4X-Ctrl | 4X | 96 | 40 | 14M | Yes | 0.2.x |
| andrewdalpino/MewZoom-2X | 2X | 48 | 20 | 1.8M | No | 0.1.x |
| andrewdalpino/MewZoom-3X | 3X | 54 | 30 | 3.5M | No | 0.1.x |
| andrewdalpino/MewZoom-4X | 4X | 96 | 40 | 14M | No | 0.1.x |
If you'd just like to load the pretrained weights and do inference, getting started is as simple as in the examples below.
First, you'll need the ultrazoom package installed into your project. For the non-control version we'll need library version 0.1.x to load the pretrained weights. We'll also need the torchvision library to do some basic image preprocessing. We recommend using a virtual environment to make package management easier.
pip install ultrazoom~=0.1.0 torchvision
Then, load the weights from HuggingFace Hub, convert the input image to a tensor, and upscale the image.
import torch

from torchvision.io import decode_image, ImageReadMode
from torchvision.transforms.v2 import ToDtype, ToPILImage

from ultrazoom.model import MewZoom


model_name = "andrewdalpino/MewZoom-2X"
image_path = "./dataset/bird.png"

model = MewZoom.from_pretrained(model_name)

image_to_tensor = ToDtype(torch.float32, scale=True)
tensor_to_pil = ToPILImage()

image = decode_image(image_path, mode=ImageReadMode.RGB)

x = image_to_tensor(image).unsqueeze(0)

y_pred = model.upscale(x)

pil_image = tensor_to_pil(y_pred.squeeze(0))

pil_image.show()
The control version of MewZoom allows you to independently adjust the level of deblurring, denoising, and deartifacting applied to the upscaled image. We accomplish this by conditioning the input image on a Control Vector that gets picked up by control modules embedded into each layer of the encoder. Version 0.2.x of the library is required for control functionality.
pip install ultrazoom~=0.2.0 torchvision
The ControlVector class takes 3 arguments - gaussian_blur, gaussian_noise, and jpeg_compression corresponding to the assumed level of each type of degradation present in the input image. Their values range from 0.0 meaning no degradation is assumed present to 1.0 meaning that the maximum amount of degradation is assumed present.
import torch

from torchvision.io import decode_image, ImageReadMode
from torchvision.transforms.v2 import ToDtype, ToPILImage

from ultrazoom.model import MewZoom
from ultrazoom.control import ControlVector


model_name = "andrewdalpino/MewZoom-2X-Ctrl"
image_path = "./dataset/bird.png"

model = MewZoom.from_pretrained(model_name)

image_to_tensor = ToDtype(torch.float32, scale=True)
tensor_to_pil = ToPILImage()

image = decode_image(image_path, mode=ImageReadMode.RGB)

x = image_to_tensor(image).unsqueeze(0)

c = ControlVector(
    gaussian_blur=0.5,      # Higher values indicate more degradation
    gaussian_noise=0.2,     # which increases the strength of the
    jpeg_compression=0.3    # enhancement [0, 1].
).to_tensor()

y_pred = model.upscale(x, c)

pil_image = tensor_to_pil(y_pred.squeeze(0))

pil_image.show()
For production deployment, you can use the ONNX models with ONNX Runtime. First, install the required packages:
pip install onnxruntime numpy pillow
Note: For GPU acceleration on Windows, use
onnxruntime-directmlinstead. On macOS, the standardonnxruntimepackage includes CoreML support.
import numpy as np
import onnxruntime as ort

from PIL import Image

model_path = "./model.onnx"
image_path = "./image.png"

# Load the ONNX model
session = ort.InferenceSession(model_path, providers=["CPUExecutionProvider"])

# Load and preprocess the image
image = Image.open(image_path).convert("RGB")
image_array = np.array(image, dtype=np.float32) / 255.0  # Normalize to [0, 1]

# Convert from (H, W, C) to (1, C, H, W)
input_tensor = np.transpose(image_array, (2, 0, 1))
input_tensor = np.expand_dims(input_tensor, axis=0)

# Run inference
outputs = session.run(None, {"x": input_tensor})

# Postprocess the output
output_tensor = outputs[0][0]  # Remove batch dimension
output_array = np.transpose(output_tensor, (1, 2, 0))  # (C, H, W) -> (H, W, C)
output_array = np.clip(output_array, 0.0, 1.0)
output_image = (output_array * 255).astype(np.uint8)

# Display the result
result = Image.fromarray(output_image, "RGB")
result.show()
The control models accept an additional input c - a control vector with 3 values corresponding to the assumed level of degradation in the input image. Each value ranges from 0.0 (no degradation) to 1.0 (maximum degradation).
| Index | Parameter | Description |
|---|---|---|
| 0 | gaussian_blur |
Deblurring strength |
| 1 | gaussian_noise |
Denoising strength |
| 2 | jpeg_compression |
JPEG artifact removal strength |
import numpy as np
import onnxruntime as ort

from PIL import Image

model_path = "./model.onnx"
image_path = "./image.png"

# Load the ONNX model
session = ort.InferenceSession(model_path, providers=["CPUExecutionProvider"])

# Load and preprocess the image
image = Image.open(image_path).convert("RGB")
image_array = np.array(image, dtype=np.float32) / 255.0

# Convert from (H, W, C) to (1, C, H, W)
input_tensor = np.transpose(image_array, (2, 0, 1))
input_tensor = np.expand_dims(input_tensor, axis=0)

# Define the control vector: [gaussian_blur, gaussian_noise, jpeg_compression]
control_vector = np.array([[0.5, 0.2, 0.3]], dtype=np.float32)

# Run inference with control vector
outputs = session.run(None, {"x": input_tensor, "c": control_vector})

# Postprocess the output
output_tensor = outputs[0][0]
output_array = np.transpose(output_tensor, (1, 2, 0))
output_array = np.clip(output_array, 0.0, 1.0)
output_image = (output_array * 255).astype(np.uint8)

# Display the result
result = Image.fromarray(output_image, "RGB")
result.show()
You'll need the code in the repository to train new models and export them for production.
git clone https://github.com/andrewdalpino/MewZoom
Project dependencies are specified in the requirements.txt file. You can install them with pip using the following command from the project root. We recommend using a virtual environment such as venv to keep package dependencies on your system tidy.
python -m venv ./.venv

source ./.venv/bin/activate

pip install -r requirements.txt
MewZoom is trained in two stages. The first stage focuses on building a foundation model for fine-tuning. It aims to jointly minimize the Pixel Loss with high and low frequency perceptual losses from the perspective of a pretrained VGG19 image classifier. To start training with the default settings, add your training and testing images to the ./dataset/train and ./dataset/test folders respectively and call the pretraining script like in the example below. If you are looking for good training sets to start with we recommend the DIV2K and/or Flicker2K datasets.
python pretrain.py
You can customize the upscaler model by adjusting the num_channels, hidden_ratio, and num_encoder_layers hyper-parameters like in the example below.
python pretrain.py --num_channels=64 --hidden_ratio=2 --num_encoder_layers=24
You can also adjust the batch_size, learning_rate, and gradient_accumulation_steps to suite your training setup.
python pretrain.py --batch_size=16 --learning_rate=5e-4 --gradient_accumulation_steps=8
In addition, you can control various training data augmentation arguments such as the brightness, contrast, hue, and saturation jitter.
python pretrain.py --brightness_jitter=0.5 --contrast_jitter=0.4 --hue_jitter=0.3 --saturation_jitter=0.2
We use TensorBoard to capture and display training events such as loss and gradient norm updates. To launch the dashboard server run the following command from the terminal.
tensorboard --logdir=./runs
Then navigate to the dashboard using your favorite web browser.
| Argument | Default | Type | Description |
|---|---|---|---|
| --train_images_path | "./dataset/train" | str | The path to the folder containing your training images. |
| --test_images_path | "./dataset/test" | str | The path to the folder containing your testing images. |
| --num_dataset_processes | 8 | int | The number of CPU processes to use to preprocess the dataset. |
| --target_resolution | 256 | int | The number of pixels in the height and width dimensions of the training images. |
| --upscale_ratio | 2 | (2, 4, 8) | The upscaling or zoom factor. |
| --min_gaussian_blur | 0.0 | float | The minimum amount of Gaussian blur to apply to the degraded low-resolution image. |
| --max_gaussian_blur | 2.0 | float | The maximum amount of Gaussian blur to apply to the degraded low-resolution image. |
| --min_gaussian_noise | 0.0 | float | The minimum amount of Gaussian noise to add to the degraded low-resolution image. |
| --max_gaussian_noise | 0.1 | float | The maximum amount of Gaussian noise to add to the degraded low-resolution image. |
| --min_compression | 0.0 | float | The minimum amount of JPEG compression to apply to the degraded low-resolution image. |
| --max_compression | 0.7 | float | The maximum amount of JPEG compression to apply to the degraded low-resolution image. |
| --brightness_jitter | 0.2 | float | The amount of jitter applied to the brightness of the training images. |
| --contrast_jitter | 0.15 | float | The amount of jitter applied to the contrast of the training images. |
| --saturation_jitter | 0.2 | float | The amount of jitter applied to the saturation of the training images. |
| --hue_jitter | 0.03 | float | The amount of jitter applied to the hue of the training images. |
| --batch_size | 32 | int | The number of training images to pass through the network at a time. |
| --gradient_accumulation_steps | 4 | int | The number of batches to pass through the network before updating the model weights. |
| --num_epochs | 100 | int | The number of epochs to train for. |
| --upscaler_learning_rate | 2e-4 | float | The learning rate of the AdamW optimizer. |
| --max_gradient_norm | 1.0 | float | Clip gradients above this threshold norm before stepping. |
| --num_primary_channels | 48 | int | The number of primary channels within each encoder/decoder block. |
| --num_primary_layers | 4 | int | The number of primary layers in the encoder/decoder. |
| --num_secondary_channels | 96 | int | The number of secondary channels within each encoder/decoder block. |
| --num_secondary_layers | 4 | int | The number of secondary layers in the encoder/decoder. |
| --num_tertiary_channels | 192 | int | The number of tertiary channels within each encoder/decoder block. |
| --num_tertiary_layers | 4 | int | The number of tertiary layers in the encoder/decoder. |
| --num_quaternary_channels | 384 | int | The number of quaternary channels within each encoder/decoder block. |
| --num_quaternary_layers | 8 | int | The number of quaternary layers in the encoder/decoder. |
| --hidden_ratio | 2 | (1, 2, 4) | The ratio of hidden channels to num_channels within the activation portion of each encoder block. |
| --activation_checkpointing | False | bool | Should we use activation checkpointing? This will drastically reduce memory utilization during training at the cost of recomputing the forward pass. |
| --eval_interval | 2 | int | Evaluate the model after this many epochs on the testing set. |
| --checkpoint_interval | 2 | int | Save the model checkpoint to disk every this many epochs. |
| --checkpoint_path | "./checkpoints/checkpoint.pt" | str | The path to the base checkpoint file on disk. |
| --resume | False | bool | Should we resume training from the last checkpoint? |
| --run_dir_path | "./runs" | str | The path to the TensorBoard run directory for this training session. |
| --device | "cpu" | str | The device to run the computation on. |
| --seed | None | int | The seed for the random number generator. |
This next stage focuses on squeezing extra performance out of the model using an adversarial training framework. Step 2 of training takes the pretrained checkpoint and fine-tunes the model using feedback from an adversarial critic model. The critic is specially optimized to detect slight differences between real images and images generated by MewZoom™. It uses feedback from the upscaler to improve its detection rate and in turn the upscaler uses feedback from the critic to improve its fool rate. This stage can be considered fully optimized when the critic can no longer reliably detect fake images i.e. the F1 score is pegged near 0.5. To start fine-tuning your pretrained checkpoint see the example below.
python fine-tune.py --base_checkpoint_path=./checkpoints/2X-100.pt
To adjust the size of the critic model use the critic_model_size argument.
python fine-tune.py --base_checkpoint_path="./checkpoints/2X-100.pt" --critic_model_size=medium
| Argument | Default | Type | Description |
|---|---|---|---|
| --base_checkpoint_path | None | str | The path to the pretrained checkpoint. |
| --train_images_path | "./dataset/train" | str | The path to the folder containing your training images. |
| --test_images_path | "./dataset/test" | str | The path to the folder containing your testing images. |
| --num_dataset_processes | 8 | int | The number of CPU processes to use to preprocess the dataset. |
| --target_resolution | 512 | int | The number of pixels in the height and width dimensions of the training images. |
| --min_gaussian_blur | 0.0 | float | The minimum amount of Gaussian blur to apply to the degraded low-resolution image. |
| --max_gaussian_blur | 2.0 | float | The maximum amount of Gaussian blur to apply to the degraded low-resolution image. |
| --min_gaussian_noise | 0.0 | float | The minimum amount of Gaussian noise to add to the degraded low-resolution image. |
| --max_gaussian_noise | 0.1 | float | The maximum amount of Gaussian noise to add to the degraded low-resolution image. |
| --min_compression | 0.0 | float | The minimum amount of JPEG compression to apply to the degraded low-resolution image. |
| --max_compression | 0.7 | float | The maximum amount of JPEG compression to apply to the degraded low-resolution image. |
| --brightness_jitter | 0.2 | float | The amount of jitter applied to the brightness of the training images. |
| --contrast_jitter | 0.15 | float | The amount of jitter applied to the contrast of the training images. |
| --saturation_jitter | 0.2 | float | The amount of jitter applied to the saturation of the training images. |
| --hue_jitter | 0.03 | float | The amount of jitter applied to the hue of the training images. |
| --batch_size | 8 | int | The number of training images to pass through the network at a time. |
| --gradient_accumulation_steps | 16 | int | The number of batches to pass through the network before updating the model weights. |
| --upscaler_learning_rate | 1e-4 | float | The learning rate of the AdamW optimizer. |
| --upscaler_max_gradient_norm | 1.0 | float | Clip gradients above this threshold norm before stepping. |
| --critic_learning_rate | 5e-4 | float | The learning rate of the AdamW optimizer. |
| --critic_max_gradient_norm | 5.0 | float | Clip gradients above this threshold norm before stepping. |
| --num_epochs | 100 | int | The number of epochs to train for. |
| --critic_warmup_epochs | 2 | int | Train the critic model for this many epochs before using it to train the upscaler. |
| --critic_model_size | "small" | str | The size of the critic model. Choice of small, medium, and large. |
| --activation_checkpointing | False | bool | Should we use activation checkpointing? This will drastically reduce memory utilization during training at the cost of recomputing the forward pass. |
| --eval_interval | 2 | int | Evaluate the model after this many epochs on the testing set. |
| --checkpoint_interval | 2 | int | Save the model checkpoint to disk every this many epochs. |
| --checkpoint_path | "./checkpoints/checkpoint.pt" | str | The path to the base checkpoint file on disk. |
| --resume | False | bool | Should we resume training from the last checkpoint? |
| --run_dir_path | "./runs" | str | The path to the TensorBoard run directory for this training session. |
| --device | "cpu" | str | The device to run the computation on. |
| --seed | None | int | The seed for the random number generator. |
You can use the provided test-compare.py script to generate upscaled images from the trained model at the default checkpoint like in the example below.
python test-compare.py --image_path="./example.jpg"
To generate images using a different checkpoint you can use the checkpoint_path argument like in the example below.
python test-compare.py --checkpoint_path="./checkpoints/fine-tuned.pt" --image_path="./example.jpg"
| Argument | Default | Type | Description |
|---|---|---|---|
| --image_path | None | str | The path to the image file to be upscaled by the model. |
| --checkpoint_path | "./checkpoints/fine-tuned.pt" | str | The path to the base checkpoint file on disk. |
| --device | "cpu" | str | The device to run the computation on. |
- J. Song, et al. Gram-GAN: Image Super-Resolution Based on Gram Matrix and Discriminator Perceptual Loss, Sensors, 2023.
- Z. Liu, et al. A ConvNet for the 2020s, 2022.
- A. Jolicoeur-Martineau. The Relativistic Discriminator: A Key Element Missing From Standard GAN, 2018.
- J. Yu, et al. Wide Activation for Efficient and Accurate Image Super-Resolution, 2018.
- J. Johnson, et al. Perceptual Losses for Real-time Style Transfer and Super-Resolution, 2016.
- W. Shi, et al. Real-Time Single Image and Video Super-Resolution Using an Efficient Sub-Pixel Convolutional Neural Network, 2016.
- T. Salimans, et al. Weight Normalization: A Simple Reparameterization to Accelerate Training of Deep Neural Networks, OpenAI, 2016.
- T. Miyato, et al. Spectral Normalization for Generative Adversarial Networks, ICLR, 2018.
- E. Perez, et. al. FiLM: Visual Reasoning with a General Conditioning Layer, Association for the Advancement of Artificial Intelligence, 2018.
- A. Kendall, et. al. Multi-task Learning Using Uncertainty to Weigh Losses for Scene Geomtery and Semantics, 2018.